
4-2. Contracts
4-2. Contracts
Deploy the token contract and the RAMP contract, then link them to your project.
What you need
- A connected wallet — deployment and linking both require a wallet connection.
- An Owner (Admin) wallet — a company-managed wallet. ONEpocket, MetaMask, and others are supported. → 3.2
- Deployment gas is about 1 $ONE or less
- Linking to a project requires at least 0.5 $ONE on the Owner address
- A Validator address → 3.3
Connectable wallets — choose one from Connect Wallet at the top right.
| Group | Options |
|---|---|
| Social Account Wallet Connect | Sign in with Apple · Sign in with Google |
| Other Wallets | ONEpocket · ONEpocket Extension · MetaMask · Privy |
- Only when using MetaMask do you need to add the ONE Chain networks manually. → 3.6
Order of work
- ① Deploy the token contract → ② Deploy the RAMP contract (HMAC Key is issued) → ③ Link the token contract to the project
4-2.1 Deploying the Token Contract
Path — Studio Contracts → Deploy Contract
- Deploy and manage ERC-20 game tokens on Testnet and Mainnet from the Studio.
- This guide covers ERC-20. The wizard shows other types, but they are not covered here.
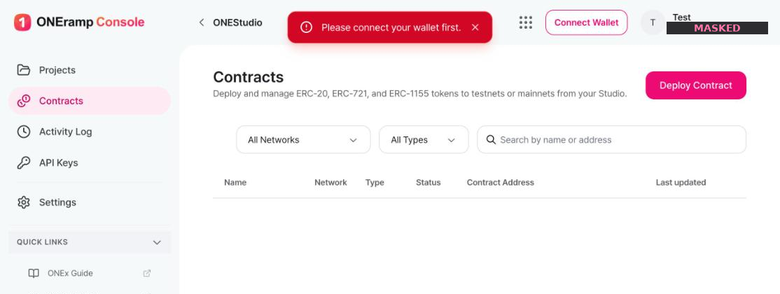
- Columns — Name · Network · Type · Status · Contract Address · Last updated
- Filters — by network and by type / Search — by name or contract address
Connect your wallet first. If you click
Deploy Contractwithout connecting, the deployment screen does not open. Connect the wallet at the top right first.
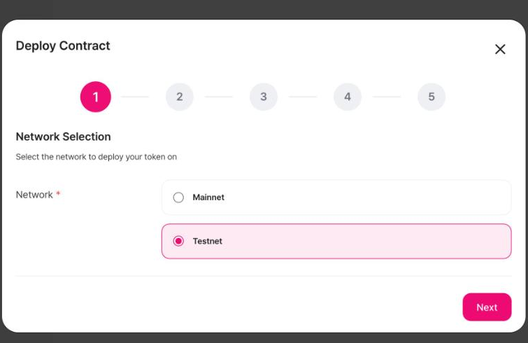
Deployment runs through a five-step wizard.
① Network Selection
- Testnet — development and validation / Mainnet — production
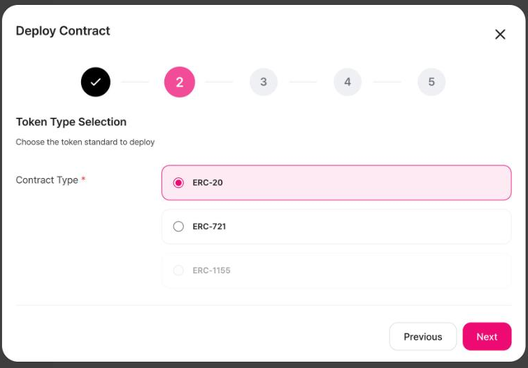
② Token Type Selection
- Select
ERC-20. This is the type for game tokens (fungible currency).
③ Basic Information
| Field | Required | Description |
|---|---|---|
| Token Name | Required | The token name |
| Token Symbol | Required | The token symbol |
| Token Image | Required | PNG · JPG · JPEG, about 3 MB or less |
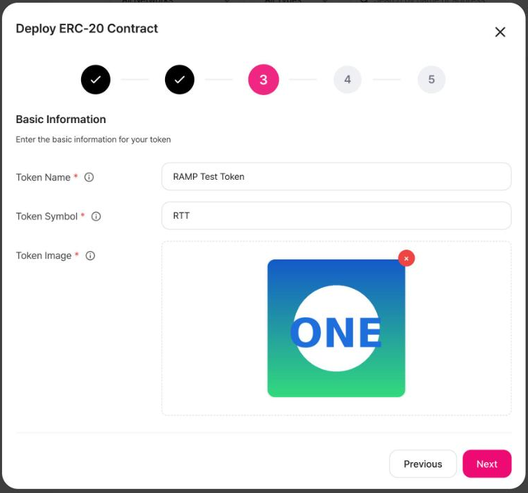
- All three are required. You cannot advance without uploading an image.
- Replace an uploaded image with the
×at the top right of the preview.
④ Admin, Supply, and Issuance Limits
Admin Settings
- Admin Address — the address holding administrative rights over the token (issuance, ownership, and so on). This must be a company-managed wallet address.
Token Supply & Distribution
| Mode | Behavior | Issuance limits |
|---|---|---|
Zero Initial Supply | No pre-issuance; mints on demand | Configurable |
Custom Amount | Pre-issues a fixed amount and deducts from it on each mint | Not available |
Issuance Limits are only available with
Zero Initial Supply.
WithCustom Amount, the pre-issued supply is held by the RAMP Contract and drawn down from there, so the pre-issued amount itself acts as the cap. If you need per-period limits, you must chooseZero Initial Supply.
Issuance Limits — toggle between Enabled and Disabled (available when Zero Initial Supply is selected).
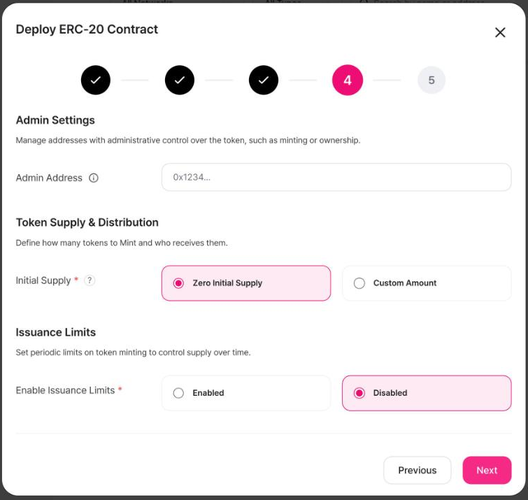
Selecting Enabled reveals three fields.
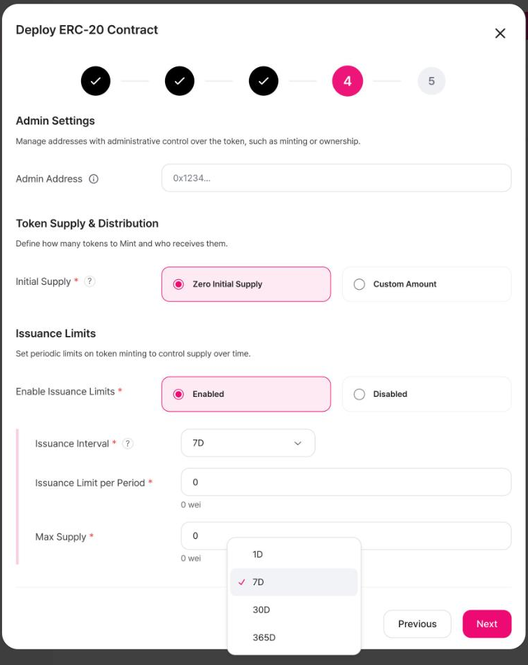
| Field | Description |
|---|---|
| Issuance Interval | Issuance period — 1D · 7D (default) · 30D · 365D |
| Issuance Limit per Period | Maximum issuance per period |
| Max Supply | Total issuable supply |
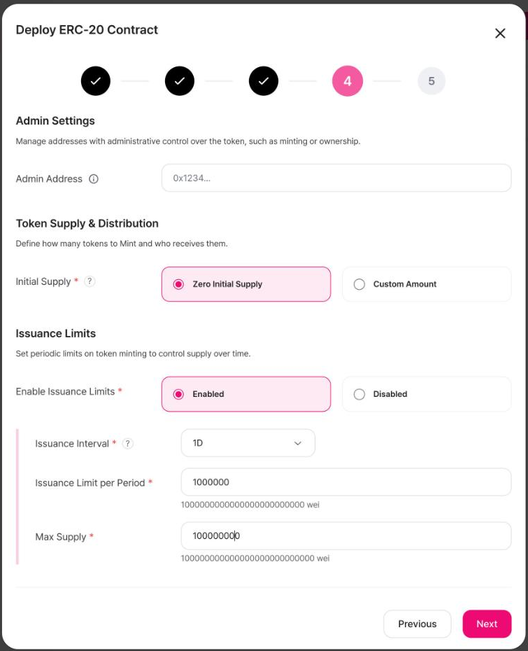
- The wei equivalent is shown live beneath the amount you type, so you can verify the digit count visually.
- Issuance limits reset at UTC-0.
⑤ Deploy Confirmation
Review every value you entered on one screen.
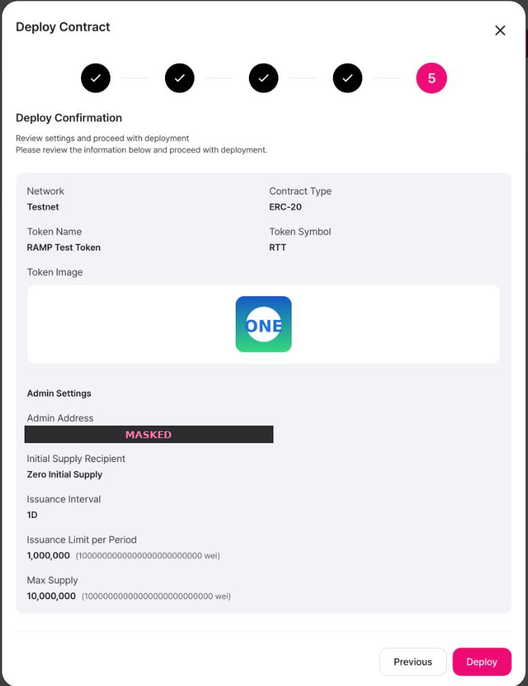
Token information and issuance settings cannot be changed after deployment. Re-check the name, symbol, Admin address, supply mode, and limits.
- Click
Deploy→ sign in your wallet → deployment proceeds
Deployment Complete
The deployed token is added to the list.
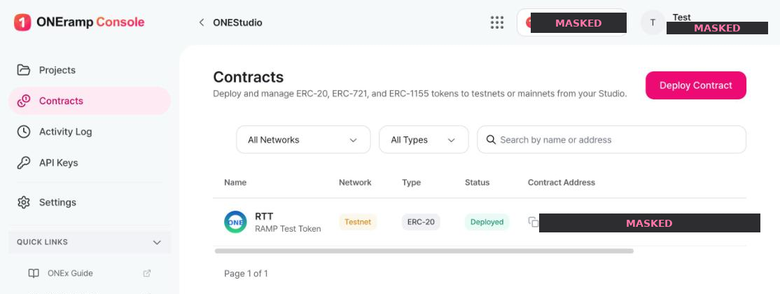
- Columns — symbol and name · Network · Type · Status (
Deployed) · Contract Address · Last updated - Use the copy icon to the left of the address to copy the contract address.
- Record the contract address. You will use it as
intent.tokenin theinitializerequest. → 5.3
Verifying the Deployed Values (Overview)
Clicking a token in the list opens its detail screen. On the Overview tab, confirm that the values you entered were applied exactly. They cannot be changed after deployment.
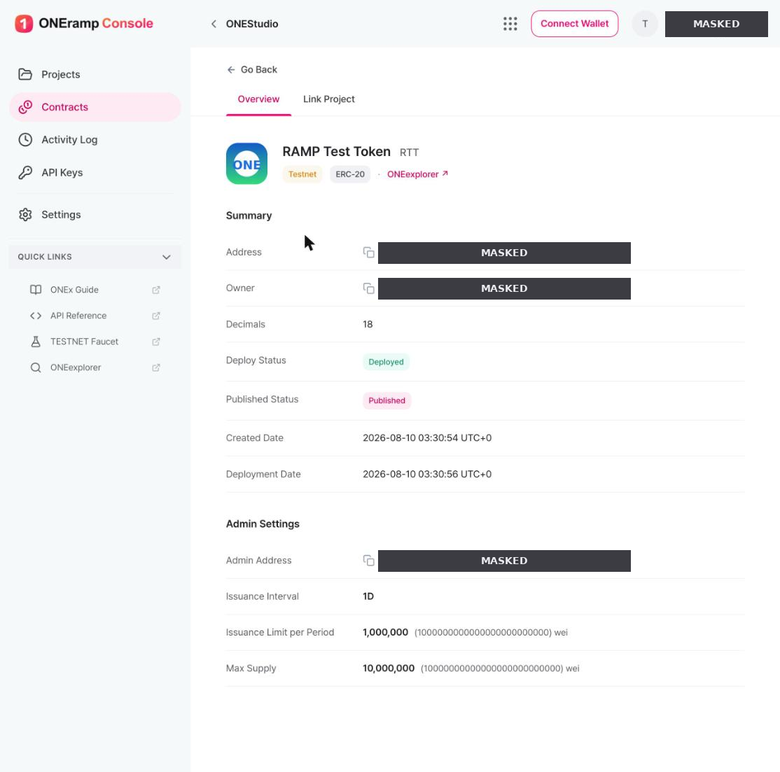
| Group | Fields |
|---|---|
| Summary | Address · Owner · Decimals · Deploy Status · Published Status · Created Date · Deployment Date |
| Admin Settings | Admin Address · Issuance Interval · Issuance Limit per Period · Max Supply |
- Confirm that
Deploy StatusisDeployedandPublished StatusisPublished. - Issuance limits are shown with both the entered value and the wei value (for example
1,000,000/1000000000000000000000000wei). Re-verify the digit count here. - Dates are in UTC-0.
If a value is not what you intended, it cannot be edited, so you must redeploy. Keep in mind that names and symbols must be unique, so pick a new name.
4-2.2 Deploying the RAMP Contract
This contract handles the internal Mint/Burn logic and must be deployed separately for each project and each network.
Path — Project ONEramp → Settings → Ramp Contract Settings → Deploy Contract
- Before deployment, only a notice and the
Deploy Contractbutton are shown. → 4-3.2 - Check the network tab (Mainnet / Testnet) at the top right first. RAMP contracts are completely separate per tab.
- Connect your wallet first. The deployment screen does not open while disconnected.
The Deploy ONEramp Contract wizard has three steps.
① Register Validator Address
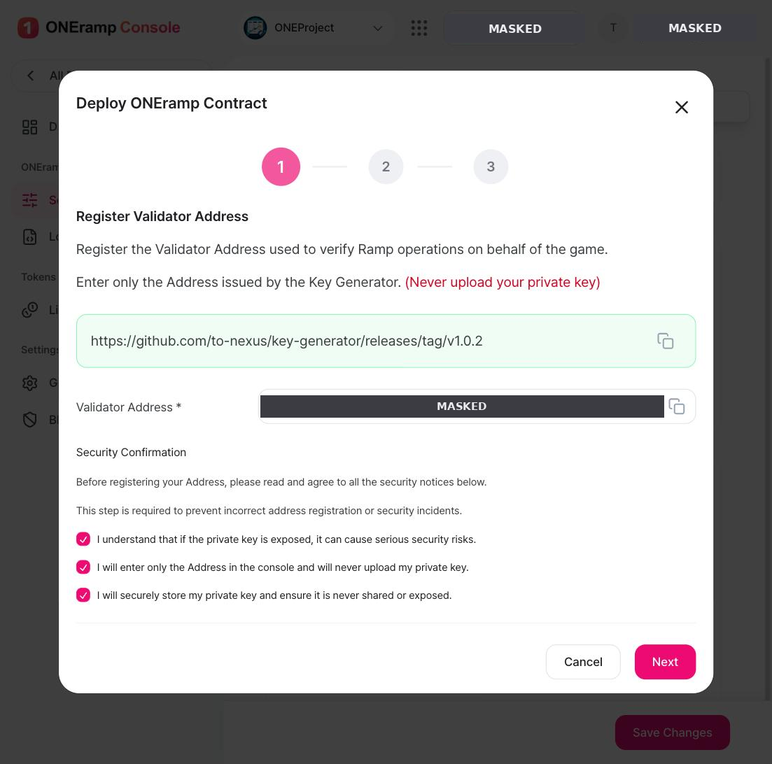
- Validator Address (required) — the address that validates Ramp operations on behalf of the game (
0x…)- It is the reference value used to verify signatures created by your backend server. → 3.3
- The Key Generator download URL is shown at the top of the screen, with a copy icon on the right.
https://github.com/to-nexus/key-generator/releases/tag/v1.0.2
- Enter the address only. Never enter or upload a private key.
- Security Confirmation — you must check all three items before
Nextbecomes active.
② Set Owner Address
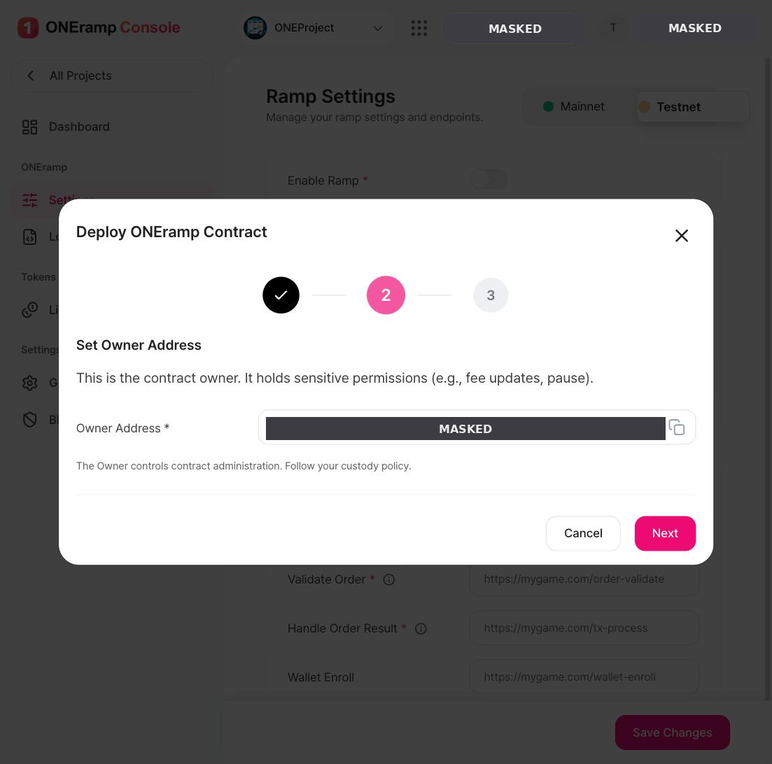
- Owner Address (required) — the address holding contract administration rights (
0x…) - The Owner holds sensitive permissions such as fee updates and pausing.
- Use a company-managed wallet, not a personal one, and document your key custody policy.
③ Review & Sign for Deployment
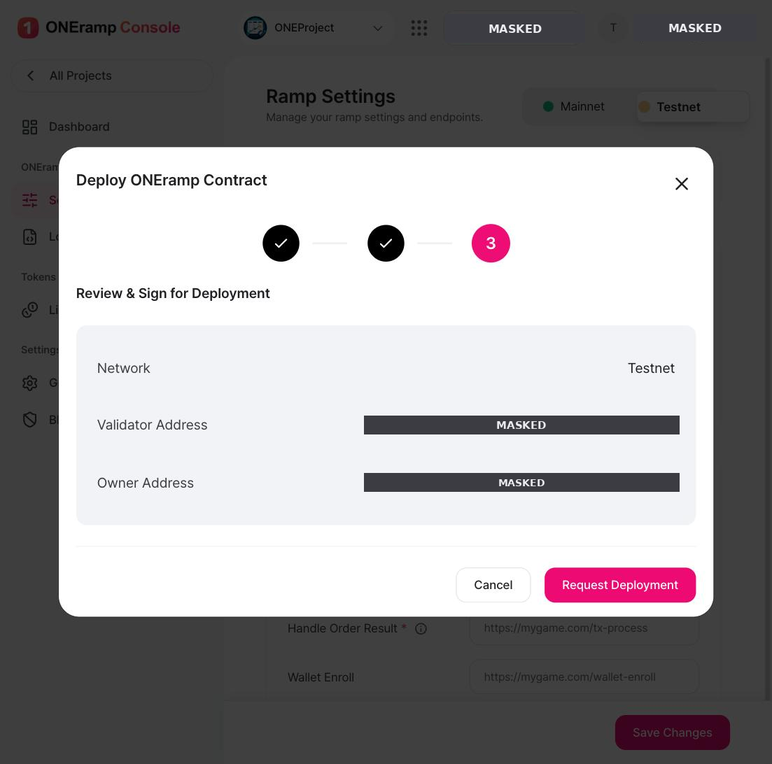
- Review the three values — Network, Validator Address, and Owner Address — before signing.
Request Deployment→ sign in the connected wallet and deployment proceeds.
Deployment Complete — Contract Info and HMAC Key
Once signing is done, the results are filled into Ramp Contract Settings.
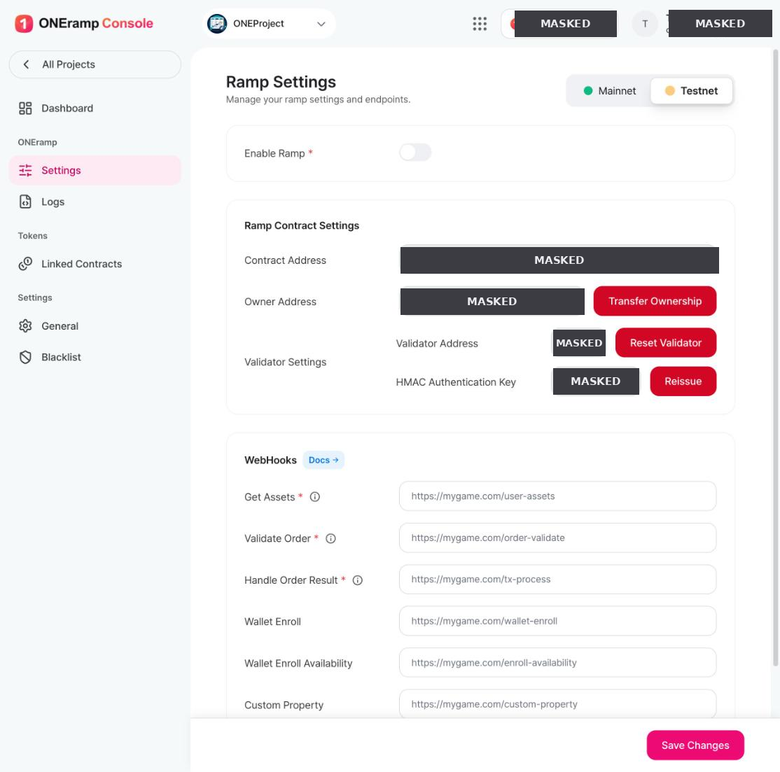
| Item | Description | Button shown alongside |
|---|---|---|
| Contract Address | Address of the deployed RAMP contract | Copy |
| Owner Address | Address holding contract administration rights | Transfer Ownership — transfer ownership |
| Validator Address | The registered Validator address | Reset Validator — replace the Validator address |
| HMAC Authentication Key | Integrity verification key for RAMP ↔ your server | Reissue — reissue the key |
The HMAC Key is the basis for integrity verification between RAMP and your game server.
It is used for theX-HMAC-SIGNATURErequest header. Store it in a secret manager immediately and use it only as a game server environment variable. → 5.3
Clicking
Reissueinvalidates the existing key immediately. Only do it when you are ready to swap and deploy the game server environment variable. Otherwise every in-flight request fails signature verification.
Reset ValidatorandTransfer Ownershipalso affect production directly. Changing the Validator address causes signatures made with the old Validator key to be rejected, and transferring ownership strips administration rights from the previous Owner.
4-2.3 Linking the Token Contract to a Project
This step grants Mint permission on the token contract so that the project's RAMP contract can mint that token.
Path — Studio Contracts → select the token contract → Link Project tab → Add Project
Prerequisites
- The RAMP contract is deployed — the project must have a Ramp Address to appear in the list. → 4-2.2
- A connected wallet — while disconnected, the
Add Projectbutton is inactive. - Wallet network = contract network — see ② below
- Gas on the Owner address — at least
0.5 $ONE(tONE on Testnet)
① Open the Link Project Tab
Selecting a token shows two tabs, Overview and Link Project. Go to the Link Project tab.
- To verify the deployed values themselves → 4-2.1 Verifying the Deployed Values
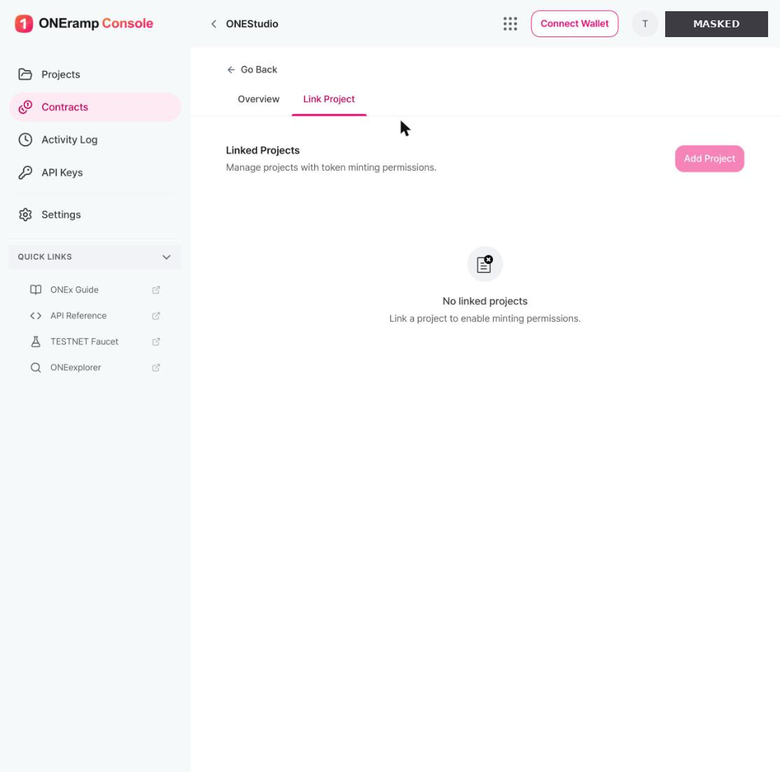
- If no projects are linked, the list appears empty.
- If the wallet is not connected,
Add Projectcannot be clicked. The screen above shows that state.
② Check the Wallet Network
If the contract is on Testnet, the wallet must also be on ONE Testnet. The Testnet tab in the console and the wallet's own network are separate. Proceeding with the wallet on Mainnet fails at the signing step.
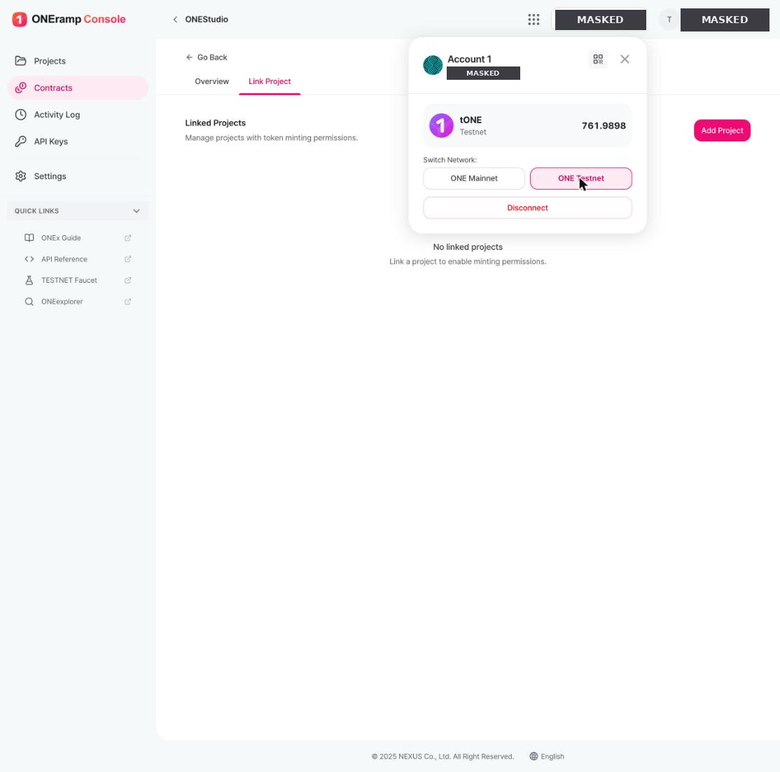
- Click the wallet address at the top right → switch between
ONE MainnetandONE TestnetunderSwitch Network - The same panel shows the balance for that network (tONE on Testnet).
- If the balance is low, top up via
TESTNET Faucetin the Studio sidebar.
③ Select Projects → Link Projects
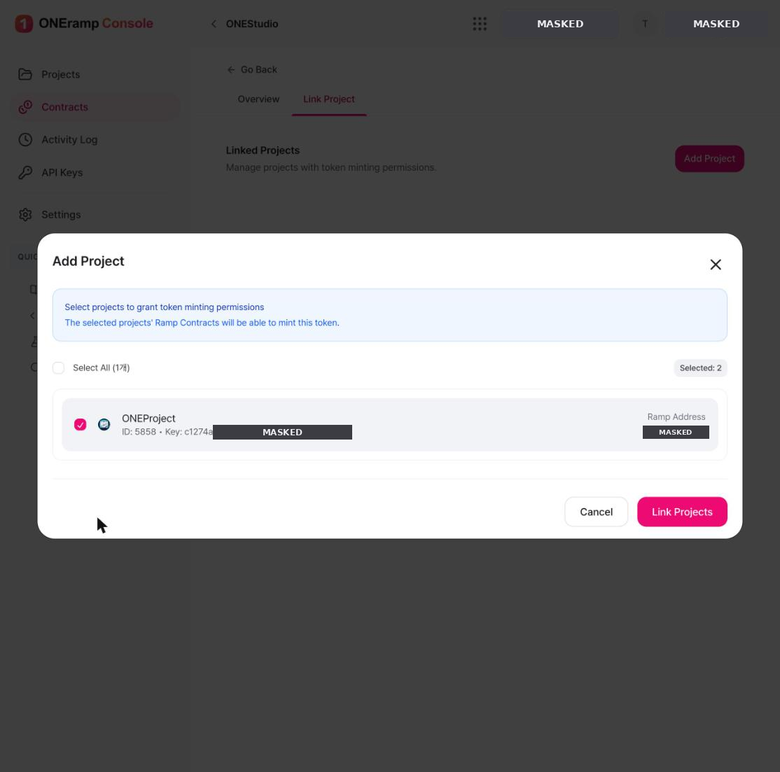
- The RAMP contracts of the projects you select here will be able to mint this token.
- Each project shows its name, Project ID, and Ramp Address.
- Check here that the Ramp Address matches the RAMP contract you deployed in 4-2.2.
- Check the box, click
Link Projects, then sign with the Owner address in your wallet.
④ Confirm the Link
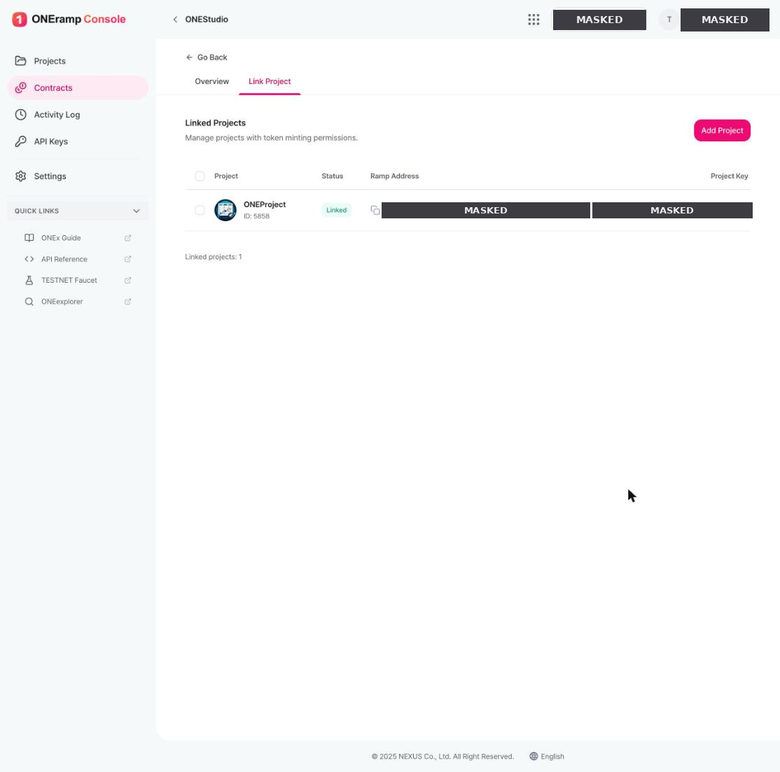
- The
Linked Projectstable shows Project · StatusLinked· Ramp Address · Project ID. - The
Linked projects: Nline below shows the count.
Confirm from the project side too — project Tokens → Linked Contracts
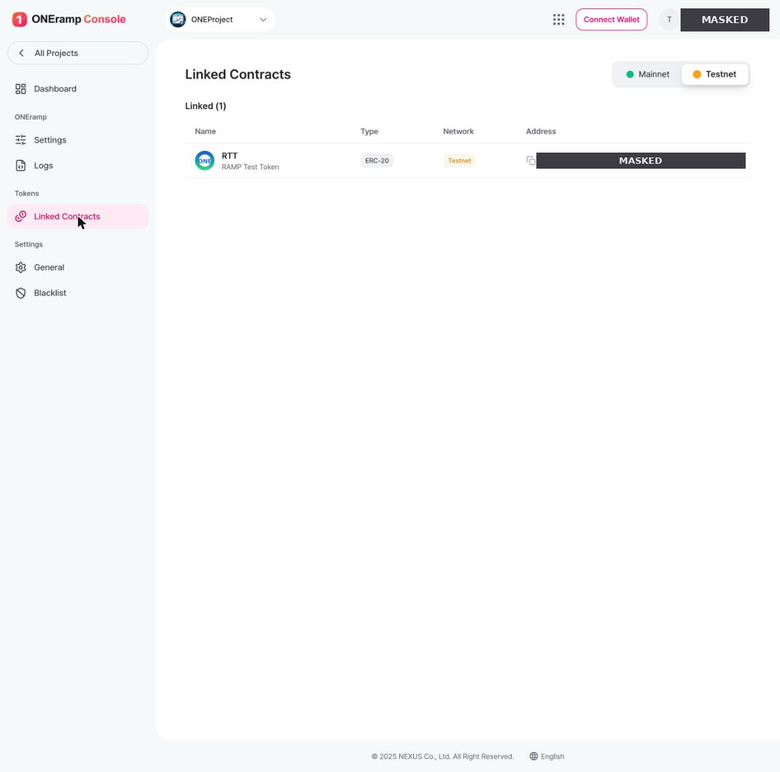
Linked (N)is shown along with Name · Type · Network · Address.- Entries are listed separately per Mainnet / Testnet tab at the top right.
Without this link, Mint and Burn will not work no matter what else you configure. Verify the link status on both screens before integration testing.
When Signing Fails
| Symptom | Cause | What to do |
|---|---|---|
Add Project button is inactive | Wallet not connected | Reconnect the wallet at the top right |
| A signature-cancelled notice appears | The signature was not approved in the wallet popup | Check the wallet popup and sign again |
| The button stays in a loading state | The wallet signature popup is hidden behind a window | Bring the wallet window to the front and approve |
| Signed, but the list is still empty | Wallet network does not match the contract network | Switch the wallet to the same network and retry |
| Insufficient gas error | Not enough balance on the Owner address | Top up via TESTNET Faucet or with $ONE |
4-2.4 Known Limitations and Gotchas
Console behaviors worth knowing in advance to save time.
| Behavior | Impact | What to do |
|---|---|---|
| The wallet disconnects after navigating or switching the network tab | Deploy Contract and Add Project stop responding | Re-check the wallet connection right before you act |
| The wallet network and the console network tab are separate | Signing a Testnet contract with the wallet on Mainnet fails | Align them via Switch Network in the wallet popup → 4-2.3 |
| Token information and issuance limits cannot be edited after deployment | A bad deployment requires redeploying | Review all values on the confirmation screen before signing |
Deploying with Custom Amount means you cannot set issuance limits | No per-period issuance control, and it cannot be changed afterwards | Deploy with Zero Initial Supply if you need limits → 4-2.1 |
The selection counter in the Add Project modal shows a different number than the actual selection (Selected: 2) | Display bug only; the link result is unaffected | Judge by the checkbox state, not the counter |
Korean strings mixed into the English UI (Select All (1개)) | Display issue | Can be ignored |
4-2.5 FAQ
Can I change the token name after deploying the contract?
Token information and issuance settings cannot be changed after deployment. The project name and icon can be changed in Settings → General. → 4-1.5
Mint and Burn are not working.
First check whether the token contract is linked to the project. → 4-2.3
Can Testnet and Mainnet share settings?
No. Contracts, HMAC Keys, and endpoints are all separate. Keep environment variables separate per network.
Updated about 2 months ago